Modeling a Built-Up Roof in Revit Architecture 2008
OK. I'm offishully an idiot. A bigger idiot, even, than George Castanza.
Some time back I listed my top three favorite features of Revit Architecture 2008 and they did not include the new slab modification tools. I figured what the heck good were they if you couldn't edit one side of the slab independently of the other?
So... if you're not as big an idiot as I am, read no further (and after that last statement, you'll know if you're as big an idiot as me). If you ARE an idiot like me, keep reading.
Turns out I was wrong - OH, so wrong. The worst part of it is, it's plainly stated in the New Features Workshop: "Slabs also have an additional parameter to create material layers with Variable thickness. When this is active, the non-variable will remain the same thickness throughout the slab while the variable layer will adjust accordingly based on the slope."
DOH! It's so blazingly simple! Try this (note: I'm assuming that you are using the default Revit template or a derivative thereof):
Create a roof by footprint. Using the line tool, draw a rectangular shape and make it a flat roof. Set the roof properties to use the type "Steel Truss - Insulation on Metal Deck - EPDM".
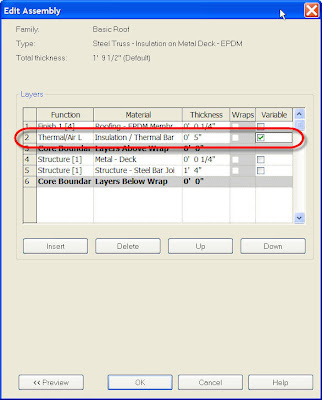
Edit the roof type properties and select the "Edit" button next to "Structure". For the 2nd row down (the "Insulation/Thermal Barriers - Rigid Insulation" material), place a check mark in the "Variable" column as in the image below.
Select "OK" to exit all dialogs.
That's the key.
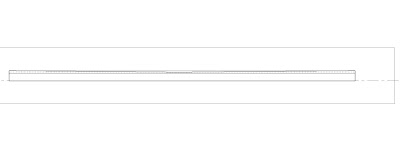
Now select the roof and use the "Draw Points" tool in the options bar (shown below), to create a single point in the middle of the roof. Set the elevation to a value like -3".

That's it. You're done. Cut a section through the roof and take a look. Only the insulation material should be modified.
How easy is that? Do you feel as stoopid as I do? Good. Come join the rest of us. We meet every Wednesday at 7 PM. Bring a covered dish (with food, stoopid!).
Some time back I listed my top three favorite features of Revit Architecture 2008 and they did not include the new slab modification tools. I figured what the heck good were they if you couldn't edit one side of the slab independently of the other?
So... if you're not as big an idiot as I am, read no further (and after that last statement, you'll know if you're as big an idiot as me). If you ARE an idiot like me, keep reading.
Turns out I was wrong - OH, so wrong. The worst part of it is, it's plainly stated in the New Features Workshop: "Slabs also have an additional parameter to create material layers with Variable thickness. When this is active, the non-variable will remain the same thickness throughout the slab while the variable layer will adjust accordingly based on the slope."
DOH! It's so blazingly simple! Try this (note: I'm assuming that you are using the default Revit template or a derivative thereof):
Create a roof by footprint. Using the line tool, draw a rectangular shape and make it a flat roof. Set the roof properties to use the type "Steel Truss - Insulation on Metal Deck - EPDM".
Edit the roof type properties and select the "Edit" button next to "Structure". For the 2nd row down (the "Insulation/Thermal Barriers - Rigid Insulation" material), place a check mark in the "Variable" column as in the image below.

Select "OK" to exit all dialogs.
That's the key.
Now select the roof and use the "Draw Points" tool in the options bar (shown below), to create a single point in the middle of the roof. Set the elevation to a value like -3".

That's it. You're done. Cut a section through the roof and take a look. Only the insulation material should be modified.

How easy is that? Do you feel as stoopid as I do? Good. Come join the rest of us. We meet every Wednesday at 7 PM. Bring a covered dish (with food, stoopid!).
posted by Matt Dillon at 4:47 PM
![]()


0 Comments:
Post a Comment
<< Home